> ## Documentation Index
> Fetch the complete documentation index at: https://docs.codaro.dev/llms.txt
> Use this file to discover all available pages before exploring further.
# Complete Setup Guide
> Get Codaro connected to your version control, task management, and IDE in three simple steps to unlock real-time Agentic Intelligence.
## 4-Steps Setup Guide
**Integration is very simple and takes around 3 minutes.** Our platform is designed for rapid deployment. If we don't currently support an app you use, please contact us at [**info@codaro.dev**](mailto:info@codaro.dev) and we commit to providing support for it within 24-48 hours.
Follow these four steps to fully connect your engineering ecosystem and begin experiencing the benefits of Agentic Management.
Codaro requires read-access to your VCS to track code changes, commits, and Pull Request (PR) activity. This data forms the **ground-truth** of all engineering work.
You must be an **Owner** or **Admin** of the organization to authorize this step.
1. Navigate to **Integrations** Tab in your Team in the Codaro web app.
2. Select your provider: **GitHub** or **BitBucket**.
3. Follow the OAuth prompt and select the repositories you want Codaro to analyze.
* **Why we need this:** This allows us to generate code activity reports and summaries, find issues in the code, and have the best data-driven insights. More strategically, this raw data is the input for the Smart Alert System and Agentic Engine, giving us the huge context necessary to predict and intervene *before* problems occur.
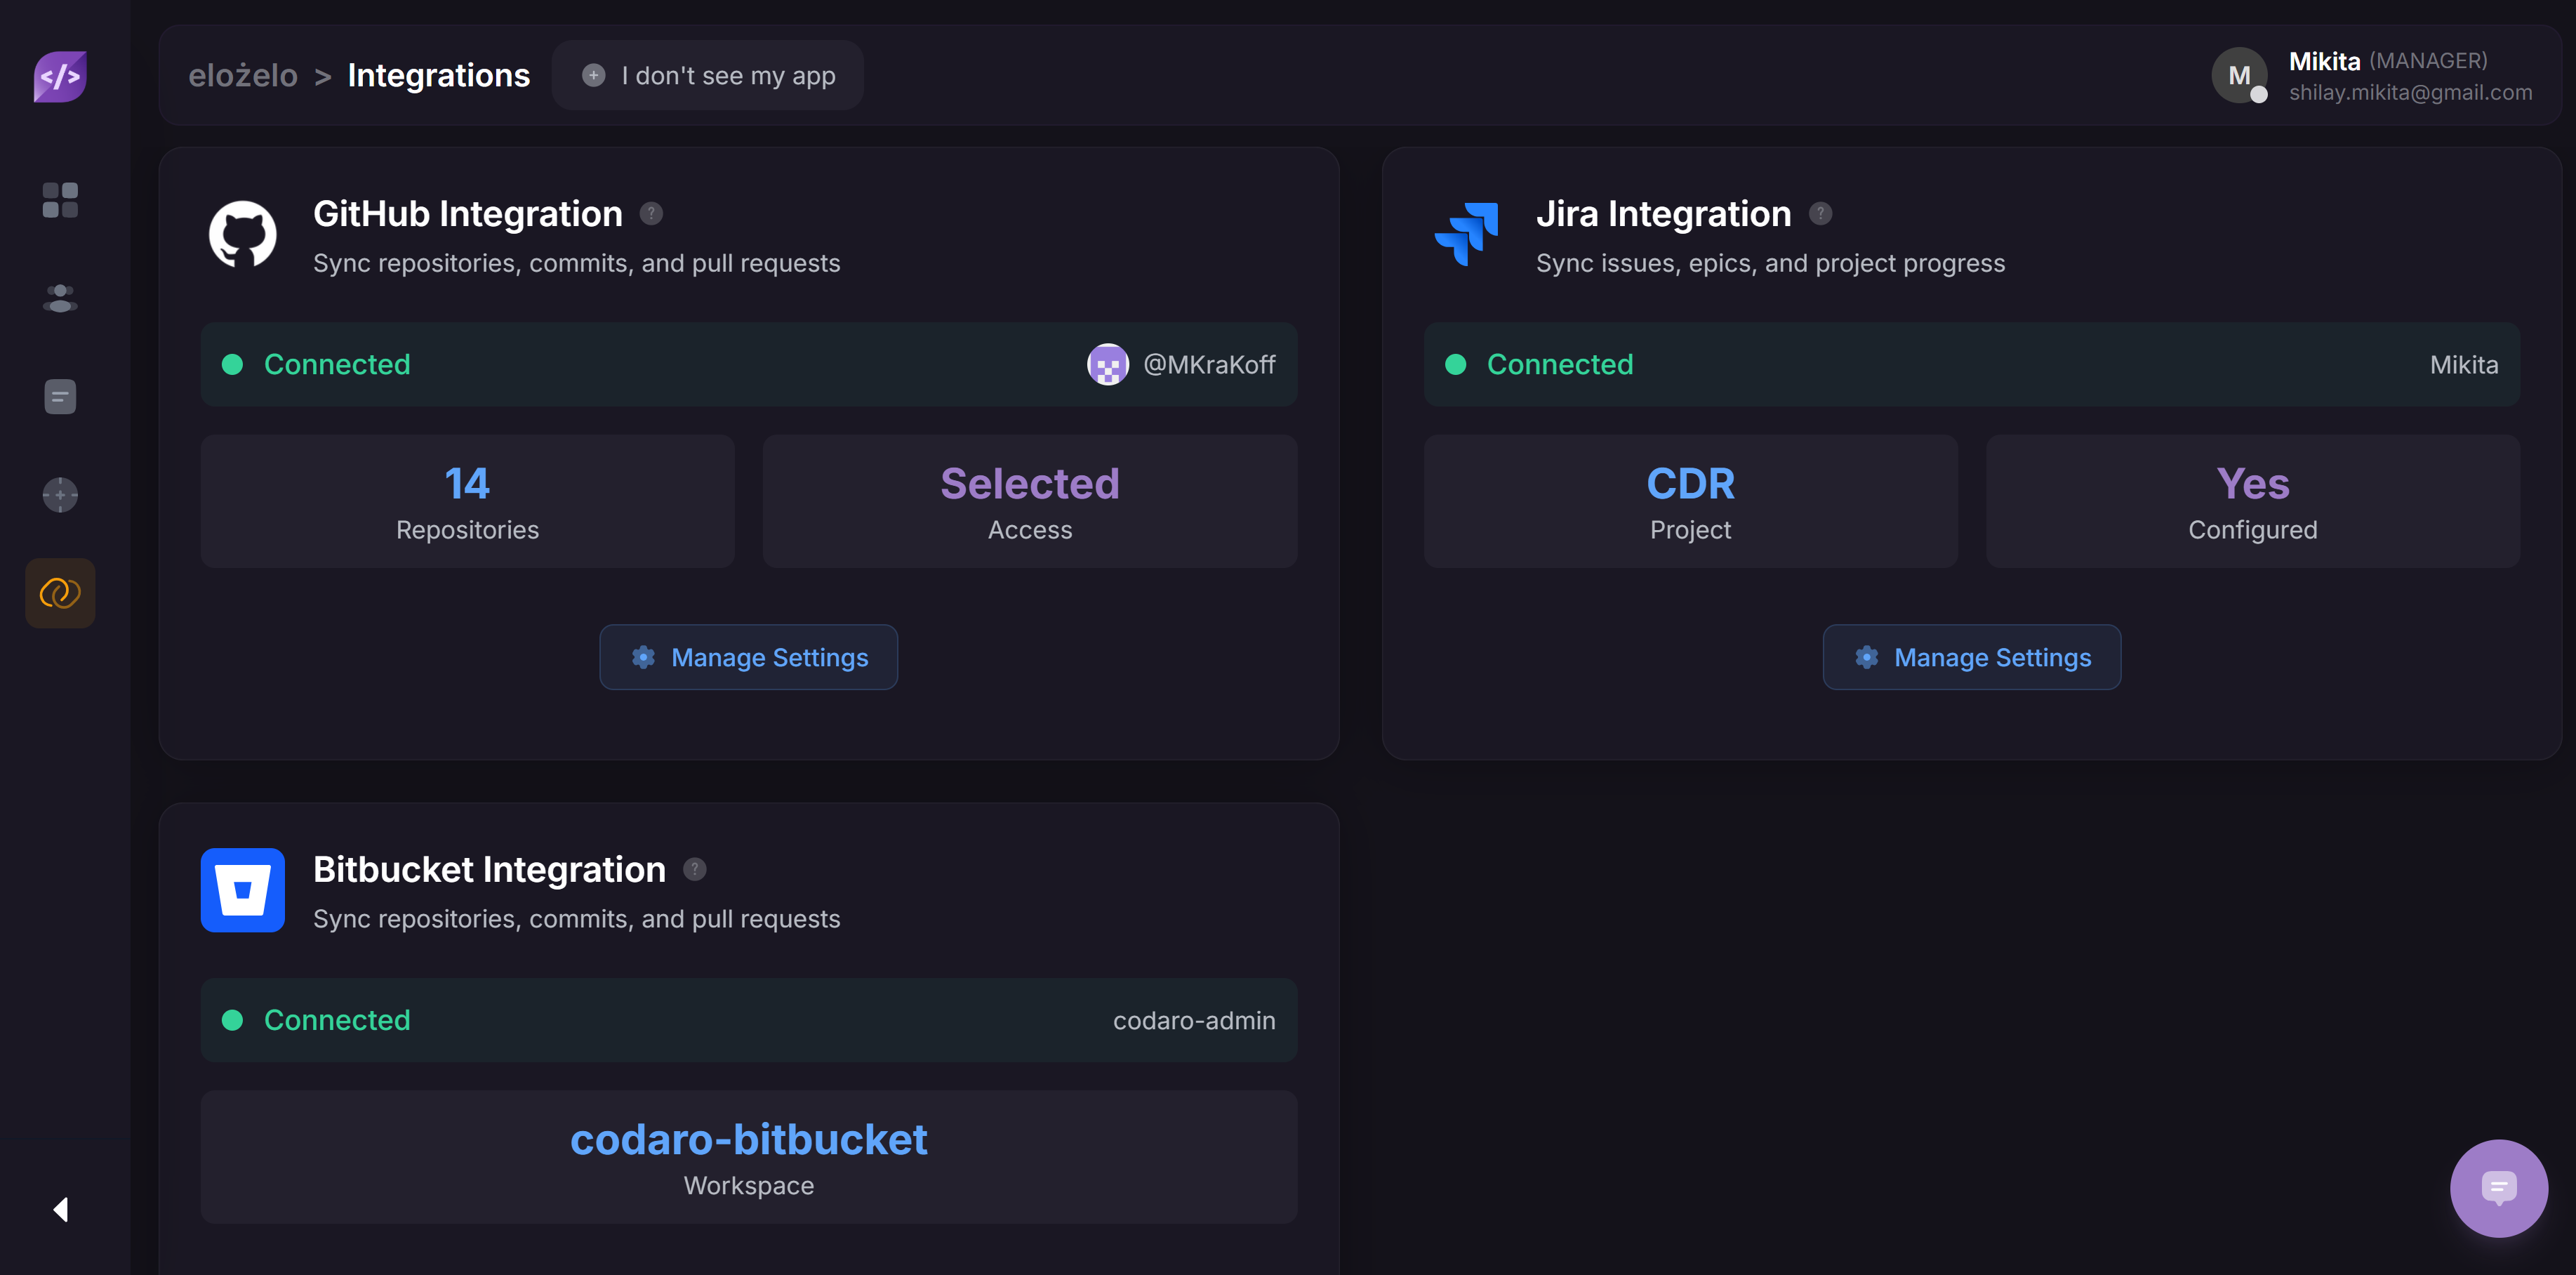 Connecting your TMS is vital for providing **business context**. This step links code activity (from Step 1) to specific project goals and deadlines, which is essential for our predictive AI.
You must have the necessary **Admin** rights within your TMS to configure the connection and map projects.
1. In the Codaro web app, navigate to **Integrations** Tab.
2. Select your provider: **Jira** (contact [info@codaro.dev](mailto:info@codaro.dev), if your App is missing).
3. Authenticate and select your TMS Project Identifiers (e.g., `PROJ`, `MVP`, `APP`) in the popup.
* **Why we need this:** This enables Codaro to link commits to your tasks, allowing for progress tracking and aggregation of **business context** for the Agentic Engine. This context is critical for predictive alerts like `TASK_STARTED` or `TASK_STALLED`.
**Context Linking Tip:** To ensure accurate linking between your code and tasks, include the Project Identifier (e.g., `PROJ-692`) in your commit message or branch name (e.g., `features/PROJ-692-new-api`).
While Steps 1 and 2 activate the core platform, inviting your team is how Codaro begins to deliver value at scale.
1. Go to the **Team** tab in Codaro and click the **Invite Team Member** button.
2. Invite team members via their email addresses. They will need to accept the invitation from the mail they recieve to gain access.
3. Once logged in, individual team members can connect their personal integrations (e.g., Jira/Github) and, crucially, download the IDE Plugin (Step 4).
For developers, the IDE Plugin is the primary interaction point with Codaro. It is the tool that preserves **flow state** and provides hyperlocal, real-time data to the Agentic Engine for comprehensive workflow analysis.
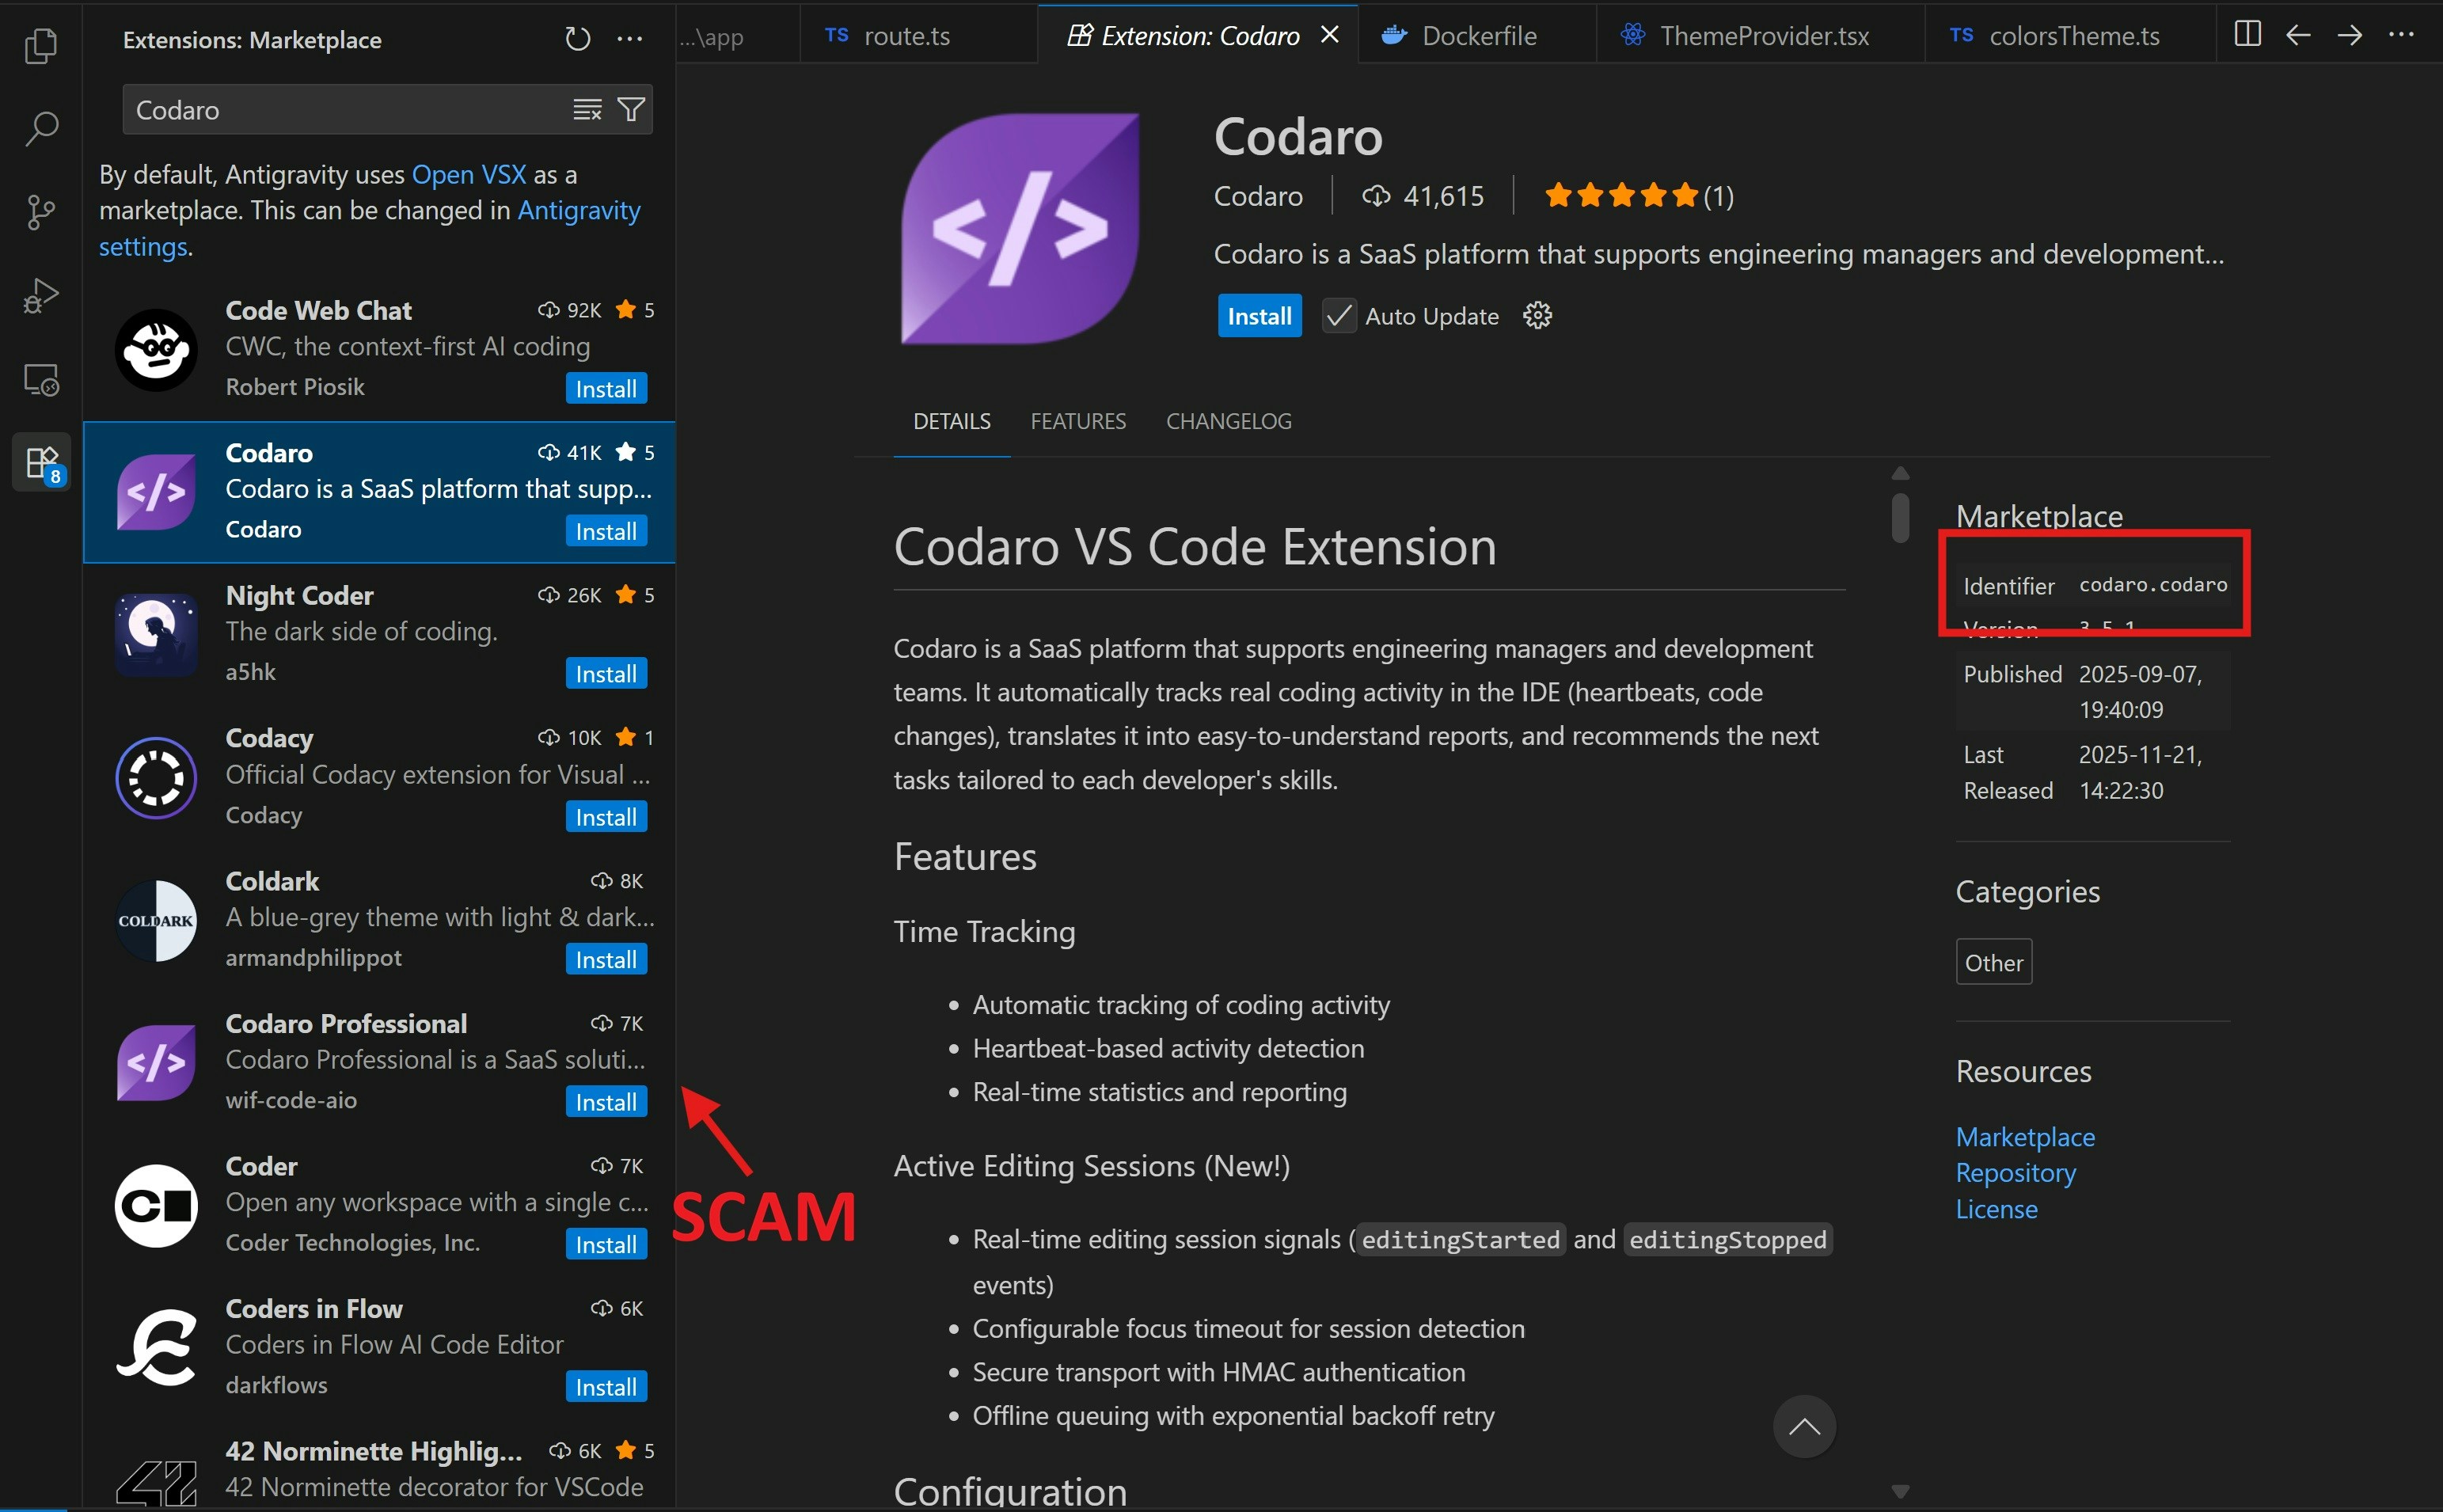
1. Search for **"Codaro"** in the [VS Code Marketplace](https://marketplace.visualstudio.com/items?itemName=Codaro.Codaro), [VSX Registry Marketplace](https://open-vsx.org/extension/Codaro/Codaro) or [JetBrains Marketplace](https://plugins.jetbrains.com/plugin/28408-codaro) and click **Install**.
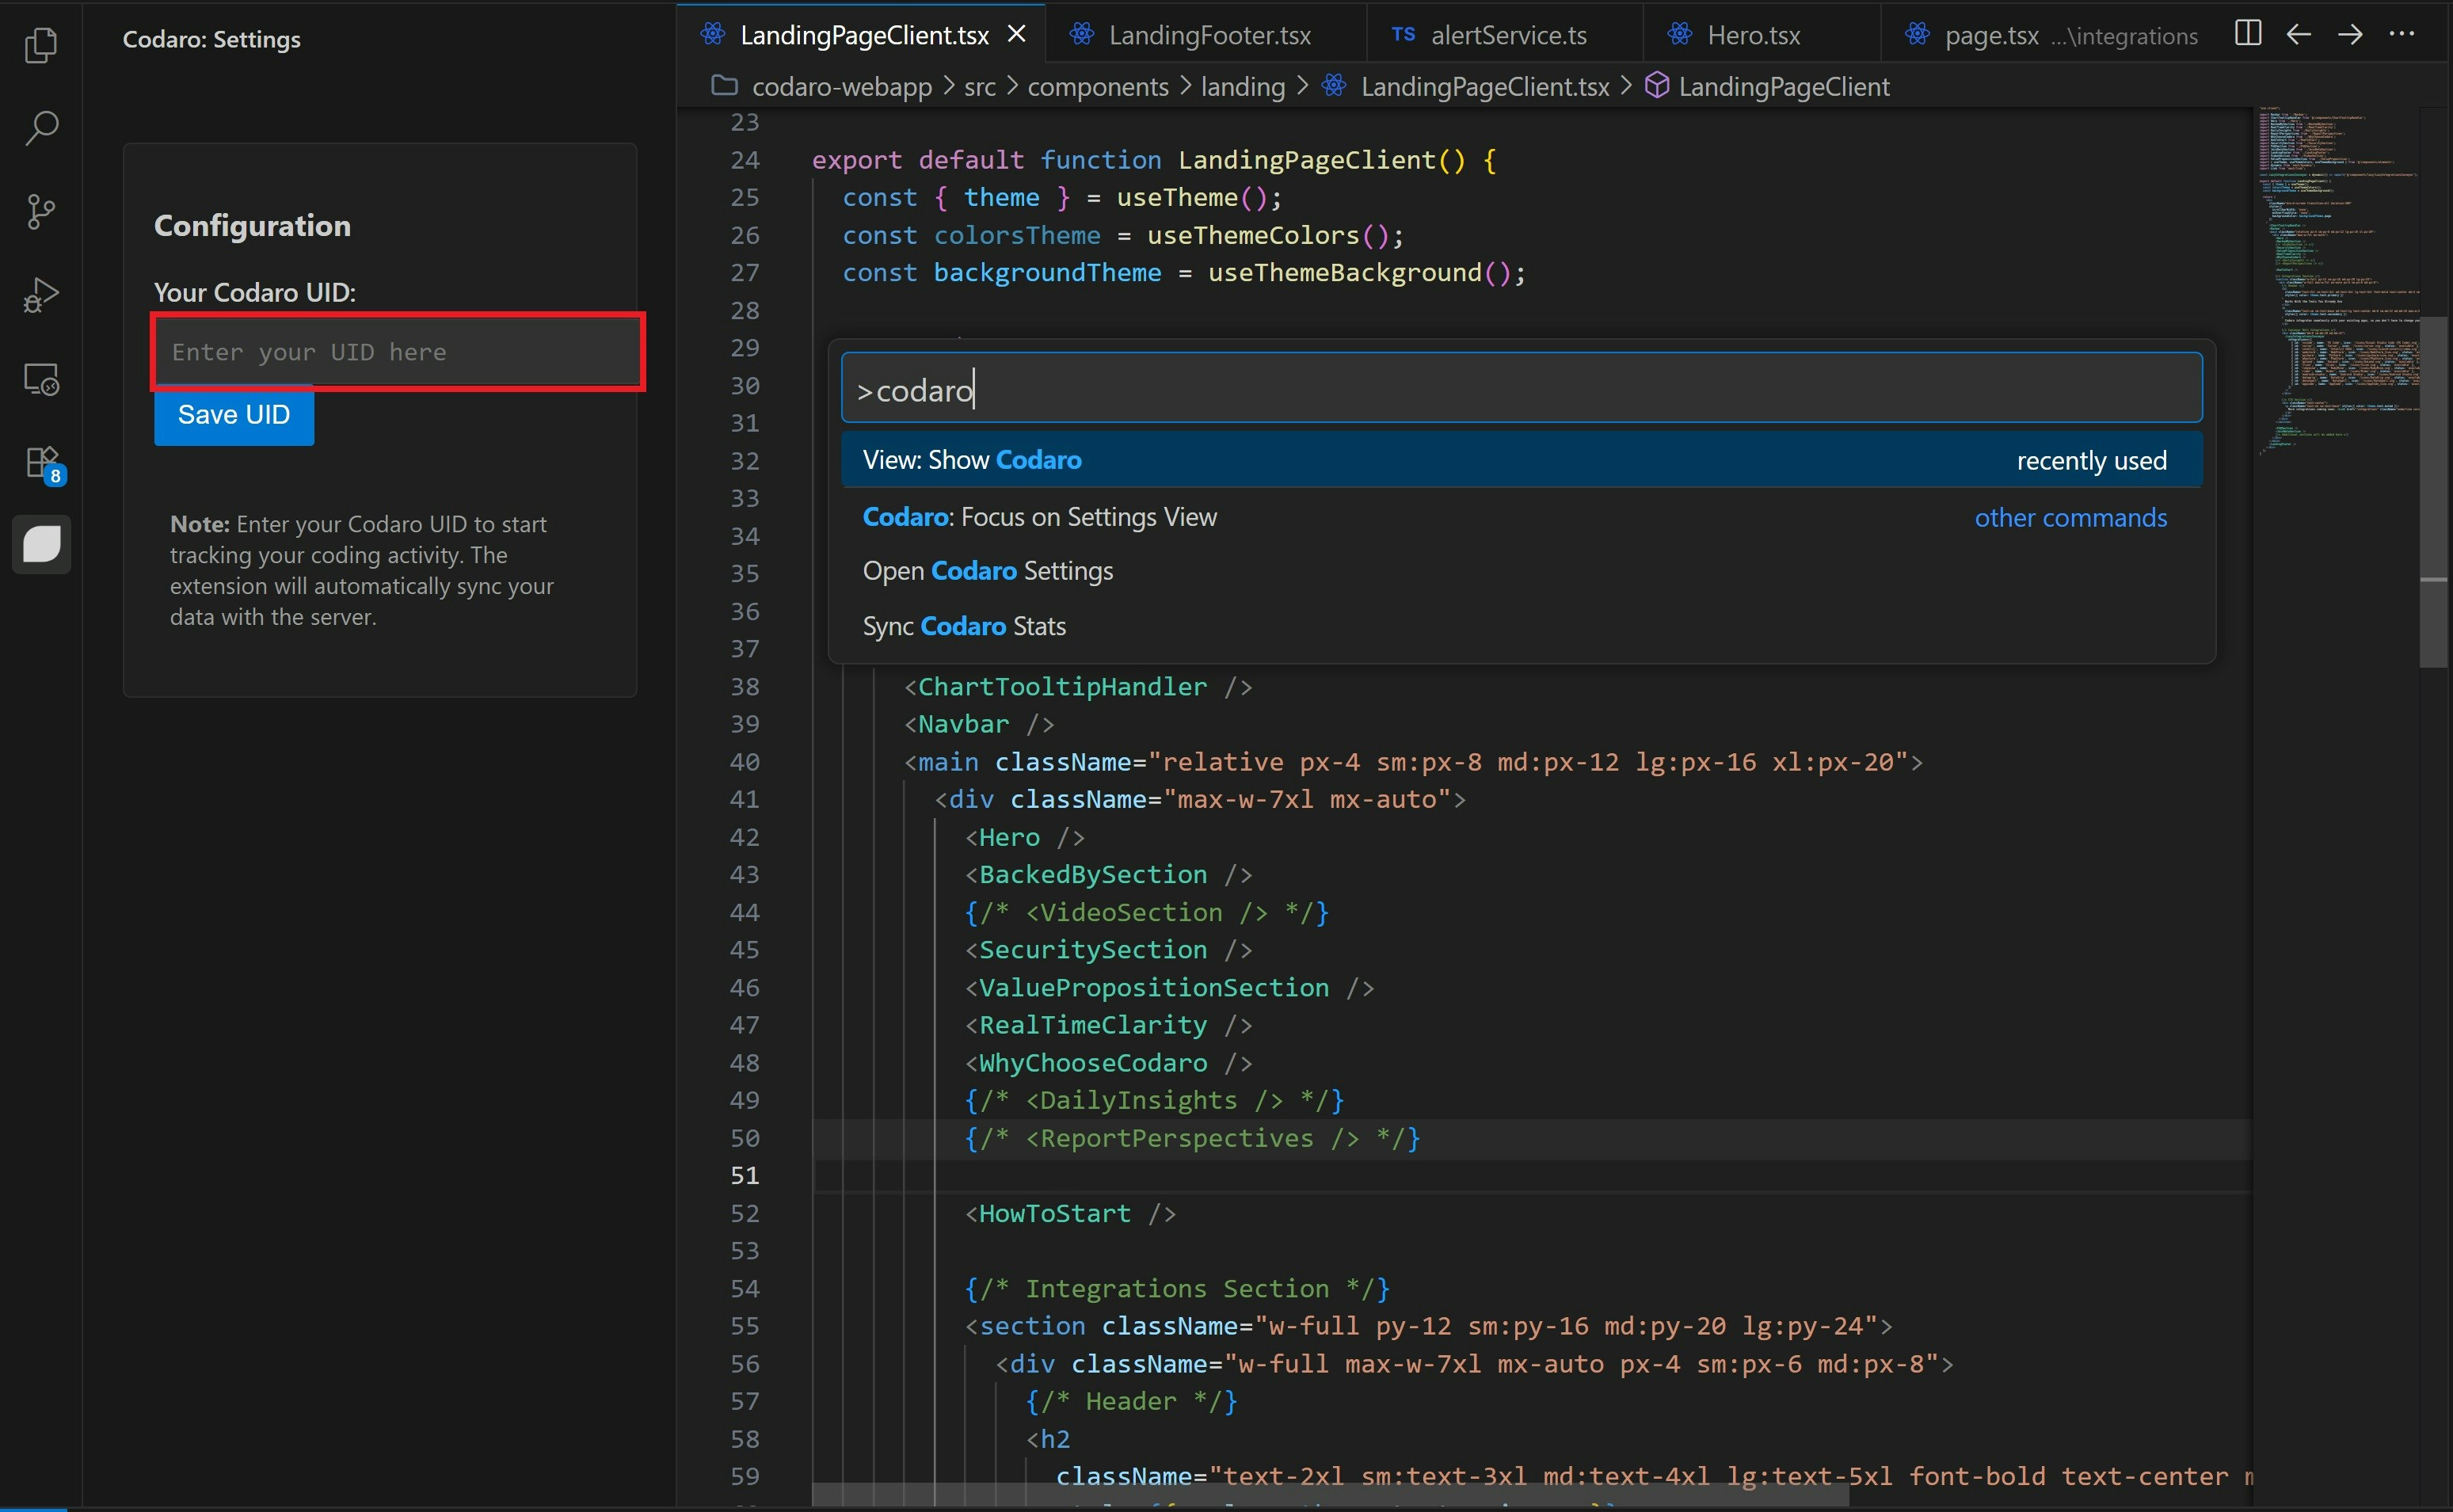
2. Use the shortcut `Ctrl+Shift+P` (or `Cmd+Shift+P` on Mac) and type **"View: Show Codaro"** to open the sidebar.
3. Copy your **UID** from the **Integrations > IDE Extension** tab of your dashboard, paste it into the sidebar input, and click **Save UID** to link your workspace.
* **Why we need this:** The plugin sends a silent 'heartbeat' (activity data) which is crucial for determining **Flow State Index** and generating hyperlocal alerts like the `COLLISION_WARNING`. This deep, real-time context allows Codaro to **analyze developer workflow** and provide insights into who is online or may potentially need a quick sync or assistance.
**Verify Your Extension**\
To avoid malicious clones, ensure you are using the official extension with the unique identifier: `codaro.codaro`
Connecting your TMS is vital for providing **business context**. This step links code activity (from Step 1) to specific project goals and deadlines, which is essential for our predictive AI.
You must have the necessary **Admin** rights within your TMS to configure the connection and map projects.
1. In the Codaro web app, navigate to **Integrations** Tab.
2. Select your provider: **Jira** (contact [info@codaro.dev](mailto:info@codaro.dev), if your App is missing).
3. Authenticate and select your TMS Project Identifiers (e.g., `PROJ`, `MVP`, `APP`) in the popup.
* **Why we need this:** This enables Codaro to link commits to your tasks, allowing for progress tracking and aggregation of **business context** for the Agentic Engine. This context is critical for predictive alerts like `TASK_STARTED` or `TASK_STALLED`.
**Context Linking Tip:** To ensure accurate linking between your code and tasks, include the Project Identifier (e.g., `PROJ-692`) in your commit message or branch name (e.g., `features/PROJ-692-new-api`).
While Steps 1 and 2 activate the core platform, inviting your team is how Codaro begins to deliver value at scale.
1. Go to the **Team** tab in Codaro and click the **Invite Team Member** button.
2. Invite team members via their email addresses. They will need to accept the invitation from the mail they recieve to gain access.
3. Once logged in, individual team members can connect their personal integrations (e.g., Jira/Github) and, crucially, download the IDE Plugin (Step 4).
For developers, the IDE Plugin is the primary interaction point with Codaro. It is the tool that preserves **flow state** and provides hyperlocal, real-time data to the Agentic Engine for comprehensive workflow analysis.
1. Search for **"Codaro"** in the [VS Code Marketplace](https://marketplace.visualstudio.com/items?itemName=Codaro.Codaro), [VSX Registry Marketplace](https://open-vsx.org/extension/Codaro/Codaro) or [JetBrains Marketplace](https://plugins.jetbrains.com/plugin/28408-codaro) and click **Install**.
2. Use the shortcut `Ctrl+Shift+P` (or `Cmd+Shift+P` on Mac) and type **"View: Show Codaro"** to open the sidebar.
3. Copy your **UID** from the **Integrations > IDE Extension** tab of your dashboard, paste it into the sidebar input, and click **Save UID** to link your workspace.
* **Why we need this:** The plugin sends a silent 'heartbeat' (activity data) which is crucial for determining **Flow State Index** and generating hyperlocal alerts like the `COLLISION_WARNING`. This deep, real-time context allows Codaro to **analyze developer workflow** and provide insights into who is online or may potentially need a quick sync or assistance.
**Verify Your Extension**\
To avoid malicious clones, ensure you are using the official extension with the unique identifier: `codaro.codaro`
 See the full list of supported Apps for Integrations in Codaro web app
## Security and Privacy
Codaro is built on a foundation of **enterprise-grade security** and strict data privacy standards. We commit to maximum data isolation and control, and we never use your proprietary code for training AI models.
Detailed documentation on data isolation, compliance (GDPR/CCPA), PII handling, retention policies, and our options for On-Premise and Self-Hosted deployment.
See the full list of supported Apps for Integrations in Codaro web app
## Security and Privacy
Codaro is built on a foundation of **enterprise-grade security** and strict data privacy standards. We commit to maximum data isolation and control, and we never use your proprietary code for training AI models.
Detailed documentation on data isolation, compliance (GDPR/CCPA), PII handling, retention policies, and our options for On-Premise and Self-Hosted deployment.